CubeVille™
an Online Life-Simulation Game
CubeVille™ is a full-featured online virtual-space for your web community. It is fully customizable with your unique branding and in-game modules. Learn how to create more social network websites from these "How to" books:
Description
CubeVille™ is a massive-multiplayer, text-based, menu-driven, Role-Playing Game (aka "RPG" or "MMORPG") for membership communities. It is licensed as a "White-labeled" PHP framework solution from Renown Games with or without web hosting. As a complete gaming solution, it was developed using the most current "full-stack" web technologies.
CubeVille™ uses a "multifunctional full-stack" PHP gaming script — e.g., a 3-tier architecture including both the "front-side client" and "back-end servers" — that lets you create your "White Labeled" membership community to your liking. The "front-end" JavaScripts are sent to members from your website, while the server back-end processes members' actions. CubeVille™ is easily tailored to your specific community's needs and lets you create the most proven respected virtual life-simulation game on the Worldwide Web to date! It was developed to study ethnic, cultural, and social interactions within a common-interest community. It is based on those Sociological studies of group dynamics. It has many other configurable options and settings, from which, you could modify (or newly create!) your desired community interactions.
A primary feature of CubeVille™ is its e-commerce capabilities. You can create "virtual products and services" for registered members as either digital products, reoccurring purchases (such as "subscriptions"), or just simple "digital-licensed downloads" (for example, "software source code" or documents). This social gaming platform provides a virtual world in an affordable Software as a Service (SaaS) model.
Instead of investing thousands of dollars to develop, and even more to maintain, a massive gaming system, this application package lets you have a socially networked syndicated gaming system for either a small annual subscription-lease or a one-time purchase fee in other "Fantasy Gaming Themes" or a "Contemporary theme" setting such as CubeVille™.
CubeVille™ delivers what you and your members want:
Young adults want to:
- Chat and Socialization;
- Dress Up and Personalization for Avatar Characters;
- Play Online Games (especially multiplayer interaction games);
- Invent their own "In-Game Modules" Adventures — especially with multiplayer interaction;
- Attend Virtual Parties (and other such fun events);
- Receive Rewards and Recognition;
- Have awesome virtual-living places to hang out in a safe, moderated environment.
- Turn visitors into community members (i.e. repeat visitors) and registered users
- Increase time spent by visitors on site
- Immerse them in your brand and messaging
- Communicate directly with your visitors and members
- Get survey feedback and suggestions from your clients (i.e. poll them)
- Monetize visitors via virtual goods and services
Within your community's activities, registered members receive a free "home-base" account (known as a "Hamlet" inside the Fantasy theme) and an account "personae" to represent their virtualized community life-style. Registered Members — using their virtual "in-game currencies" (aka "Cubits") — can buy vehicles, properties, items, home-base upgrades, "Avatars", storage garages or hangars for their transport vehicles, waterfront piers (aka "Quay"), pets, characteristic-point enhancements, and so much more to improve their "respect and popularity" (? i.e., assuming a non-criminal) "community status". Members have the opportunity to work in a variety of careers (using the "Career Portal" (a Work-in-Progress (WIP)), earn actual college education (using the "Education Portal"), exercise in gyms, heal their health in hospitals, and many other activities that are hidden within the software. To earn extra money, gold, experience, and other such bonuses, members will upgrade their personae through chosen activities found in the "Gaming Portals".
Requirements
- A Web hosting account — assuming that you're deploying this game for general public access.
- A top-level domain (TLD) name — often included "FREE" with web hosting plans — assuming that you're deploying this game for general public access.
- PHP CGI/Fast (a web server with version 8.x or 7.x)
- MySQLi (a database server with version 4.x or 5.x)
- Cron Jobs [Optional]
Support
For any query or problems feel free to contact us at the following Emails:
- Customization Support: https://www.stephen-gose.com/about/contact/ (Subject: Contract)
- Installation Support: support [at] pbmcube.com (Subject: Installation)
- Technical Issues Reporting and Support: support [at] pbmcube.com
Features
- (Private) Messaging System — Members (18+ years; under 18 years of age are restricted), can send private messages to their neighbors through this system.
- 99% Responsive — Looks good on almost all devices and screen resolutions.
- Adventures, Explorations & Quests — Members can go on discovery adventures, quests, and exploration through the various "Portals" inside CubeVille™ and the surrounding province. Portals are "worm holes" into fantasy, historical, or futuristic Gaming genres. While "traveling", your members earns: wealth, status, popularity, renown, and characteristic enhancements from their avatar's activities inside the "Portals". What if their "Avatar" meets a deadly situation? Not to worry, they just drag it back to CubeVille™ and simply "repair" their Avatar suit.
- AJAX Player Statistics — Each Member's Persona Statistics and Avatars are updated automatically in background processes without refreshing the entire page. The need for a "cron job" is therefore redundant.
- Bank — Members can protect their "in-game currency" at the local bank and earn interest on their deposits.
- Careers & Jobs — Members can go to "Work" and select their preferred Job to earn a steady income.
- Casino — Members can invest money in the "CubVille™ Casino" to multiply their deposit or to earn additional bonuses.
- Character Personae — After registration, a member can select their characterized personae. Each persona initially has specific skill sets.
- Chat System — Live Chat System uses AJAX that can help all members to communicate with one another.
- Comments Section — Every member has a "comments section" that is used by their neighbors to write "graffiti" on each other's wall.
- Customized Pages — This module gives you the ability to add Custom Pages for your specific community.
- Dashboard + Stats System — Members can review their game's progress and statistics in their "Account Dashboard".
- Easily Customizable Source Code — This source code is written in PHP, consistent Procedural-style, and everything can be easily customized in very little time.
- Easy of use — The game was developed to be simple and is very easy to understand and use.
- Easy to setup — The script is very easy to install and every step is described in the "Installation" section below.
- Facebook Login — The members can easily register or login via their Facebook profile.
- Fight Arena — Members can "oppose" other members — as figuratively represented by "lawsuits", "mob gang hits", "physically fighting", "psychological slander", or "public debates" — to earn additional money, gold, and respect.
- Gym — Members can go to a Gym for "physical work-outs" and training to improve their skills and abilities.
- Home, Garage, Hangar, and Waterfront Upgrades — Homes, Garages, Hangars, and Quays are upgraded to accommodate more pets, vehicles, airplanes, and boats.
- Hospital — When a member's health declines, they can go to the Hospital Clinic to restore their health.
- Leaderboard — The ranking of all members in the game.
- Levels — Members can climb the social ladder (i.e., level up) by doing a variety of activities or buying various "status symbols".
- PayPal Integration — The game integrates with PayPal, so you can earn real cash from membership's digital purchases.
- Pets — Pets make a home more beautiful and add different skills to a member's persona.
- Powerful Administrative Panel — Game settings and most game mechanic modules are modified easily from the comprehensive "Admin. Panels".
- Properties — Members can buy "virtual real estate" properties and then receive income periodically from their rents.
- Resources — Members can purchase, through the e-commerce integration, additional "Avatar Suites", in-game Currency, Gold, VIP Status, and other bonuses to improve their persona characteristics in the game.
- School — Members can go to live "School Rooms" to improve their persona's intelligence. Members can attend real online college courses and earn recognized degrees through the "Education Portal".
- Secure — The script is integrated with special security functions borrowed from Project SECURITY to protect the whole game and its members.
- Shopping Mall — Members can buy different "status symbols", and items. Every item purchased improves different characteristics that help in the "Fight Arena" and "Portals".
- Street Races — Members can race against one another to earn additional money, gold, and respect. Watch out for the speed limits!
- Themes — The game has different themes. Many "Portals" use these themes.
- Vehicles — A variety of Vehicles in different Categories are available. Vehicles are used in "Street Races" and various racing contests or tournaments.
- Very Optimized — This gaming script is very lightweight. The source code and graphics are highly optimized.
Installation
- Upload the files from the script's "Source" folder into your web host account. (watch this 1-minute video: "Drag & Drop File Manager").
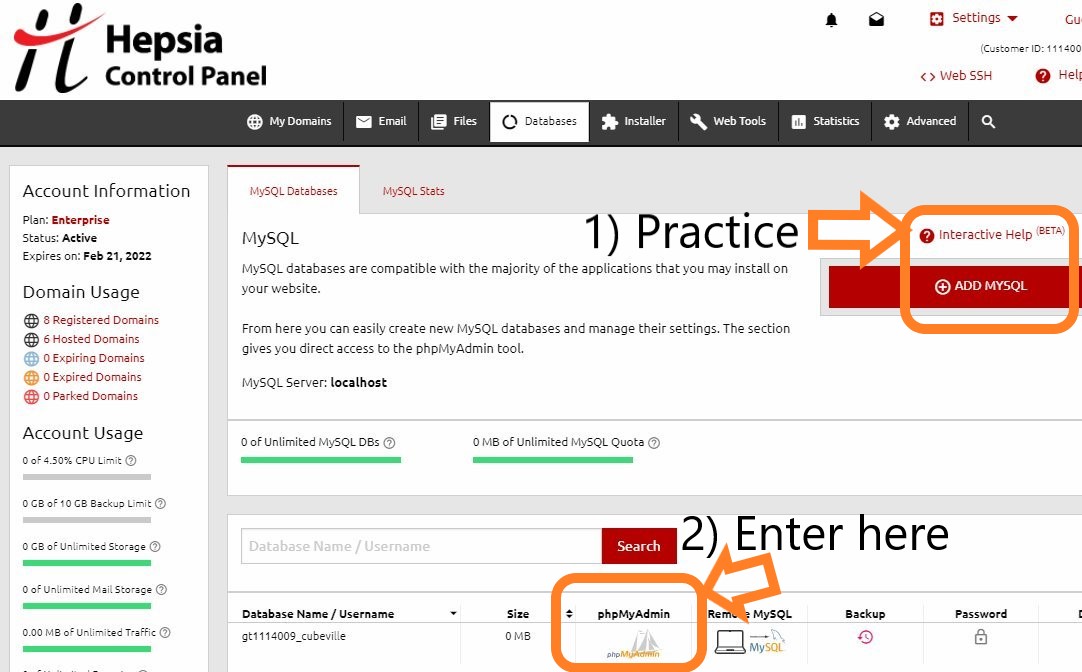
- Create a dedicated MySQL database (watch this 1-minute video: "Advanced Database Manager").
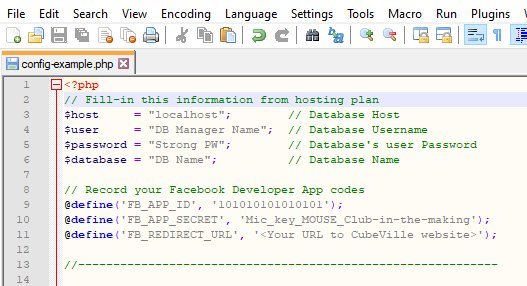
Practice setting up a database and review this interactive tutorial here. - Inside the "Source/config.php" file, Open and fill-in lines 3, 4, 5, and 6 with your database's information.
- Enter your newly created database using "PHPMyAdmin".
* Use your live web hosting access; this won't work in the demonstration mode.
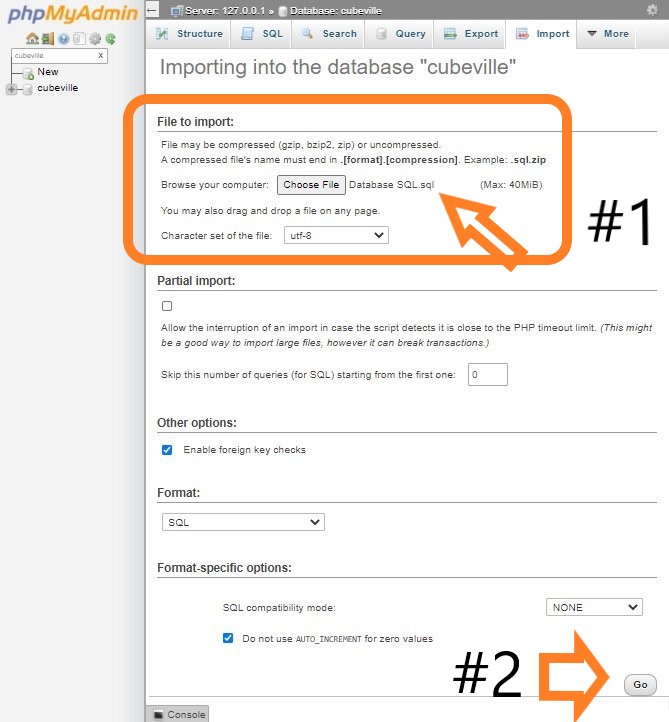
- Then, Import your database source code file (SQL/"Database SQL.sql") using the "PHPMyAdmin" import tab.
Note: If you are updating the CubeVille™ gaming engine, you must perform a clean installation: 1) delete all CubeVille™ related database tables; 2) then replace those with the updated content and follow these "Installation Steps" again. This is required because the database tables' structure could be modified. To backup your data export all CubeVille™ related database tables. - Generate your "ReCaptcha" v2 keys; see the instructions below. Log into your admin account using the defaults: admin and admin [Username & Password]. Then, inside the "Admin Panel", Add your unique "ReCaptcha v2" keys on the "Settings" page.
- Change the default "admin" account password from "admin" and record your changes.
The game demonstration uses: demo and demo [Username & Password]
This account is reset every five minutes or on log out.
CRON Jobs (optional)
- Go to the "Advanced" Tab and then select "CRON jobs".
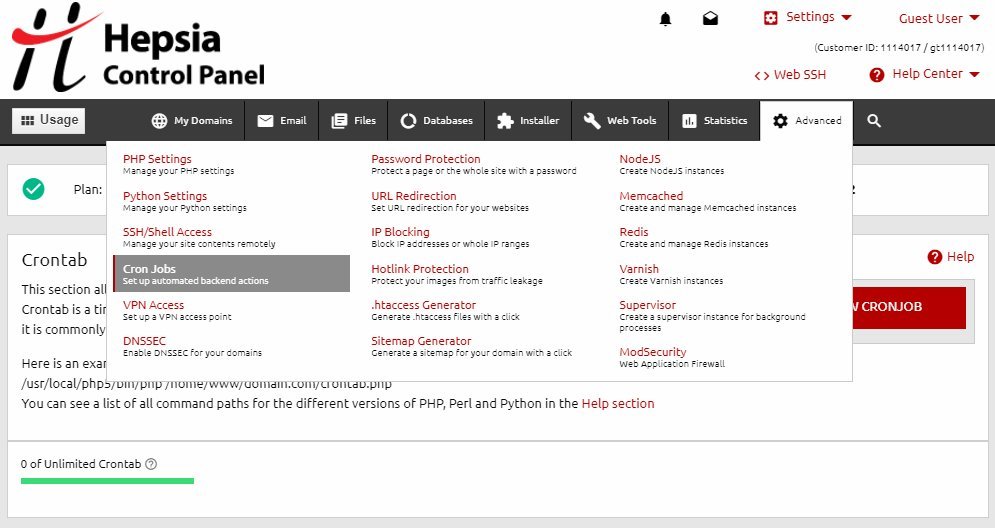
* NOTE: If your chosen web host does not support Cron Jobs you can use this website: Cron-Job.org
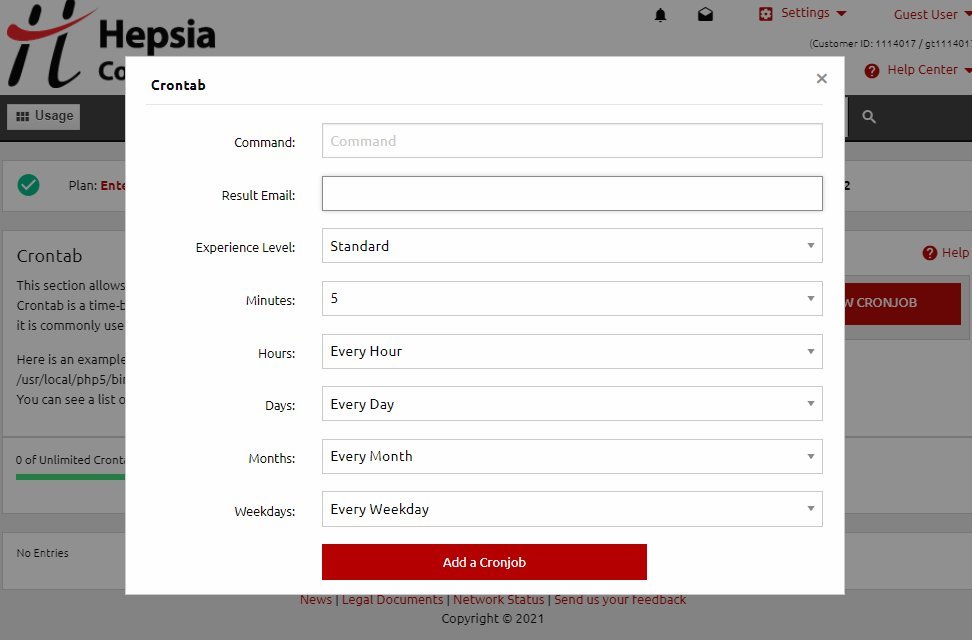
- To set up a cronjob you will need to press the "Create A New Cronjob" button and set a few parameters: the schedule, execution command, and the email to where the cronjob result notifications should be sent. Experience level - you can choose between Standard or Advanced levels of experience - this is how you might set up its scheduled times.
Here is an example of a cron job schedule:
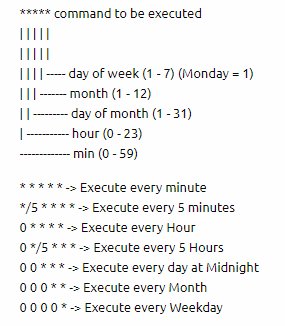
Example commands:
php /home/<web hosting name>/<domain>/cubeville/cron/energyrefill.php
php /home/<web hosting name>/<domain>/cubeville/cron/full-energyrefill.php
PayPal Integration Guide
Follow these official Paypal instructions:
https://developer.paypal.com/docs/api-basics/notifications/ipn/IPNSetup/#setting-up-ipn-notifications-on-paypalExample Callback URL:
https://yoursite.com/paypal-ipn.php
- Login To Your PayPal Account
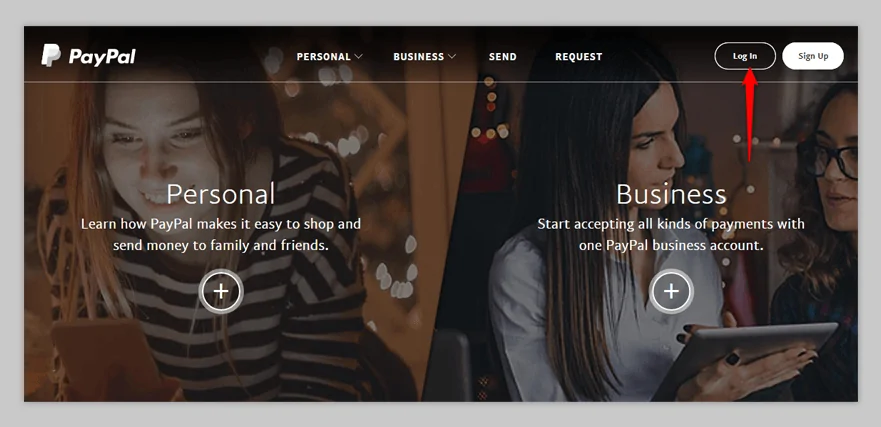
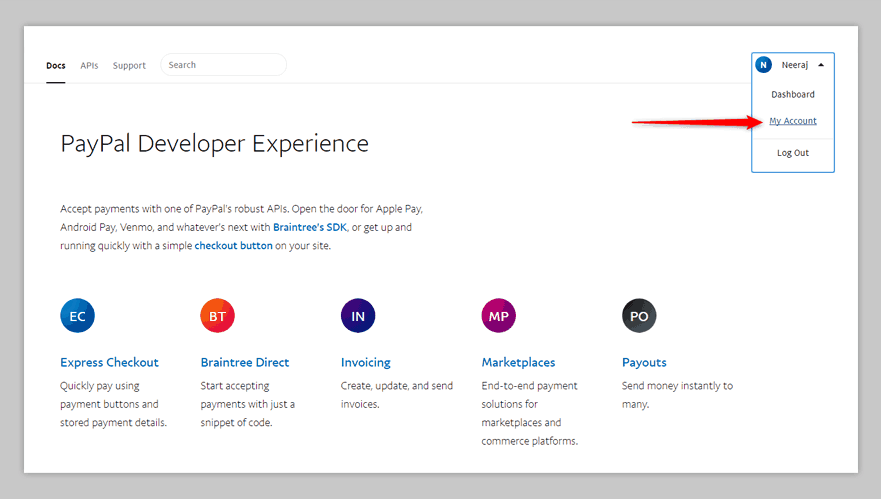
- Manually Change To Developer URL & Click On “My Account” — Once you have logged into your Paypal account, you must manually change the URL to “https://developer.paypal.com/“. Or, simply click here – https://developer.paypal.com/. After this, you'll select the drop-down menu and click on "My Account" sub-menu.
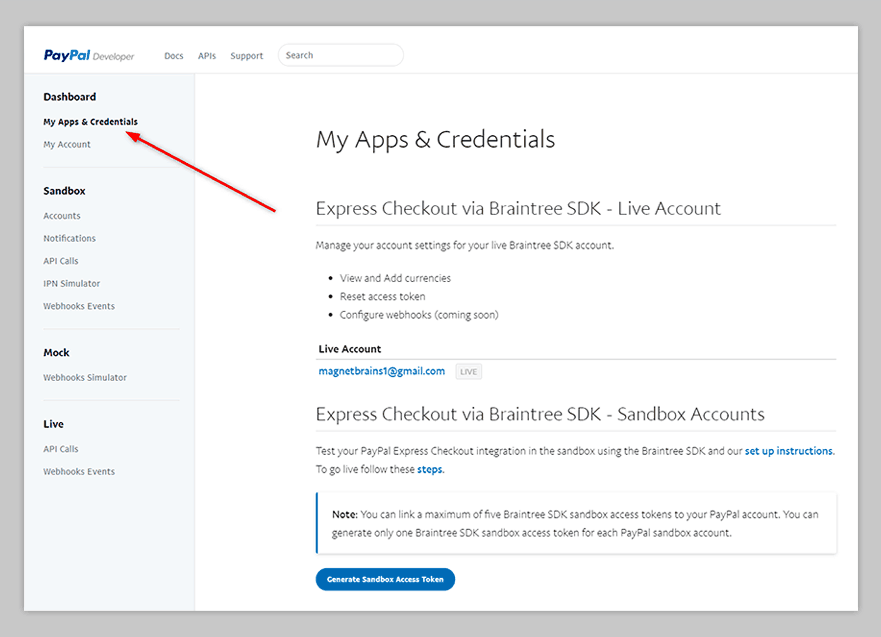
- Click On “My Apps & Credentials” — In the developer dashboard, click on “My Apps & Credentials” available in the left sidebar.
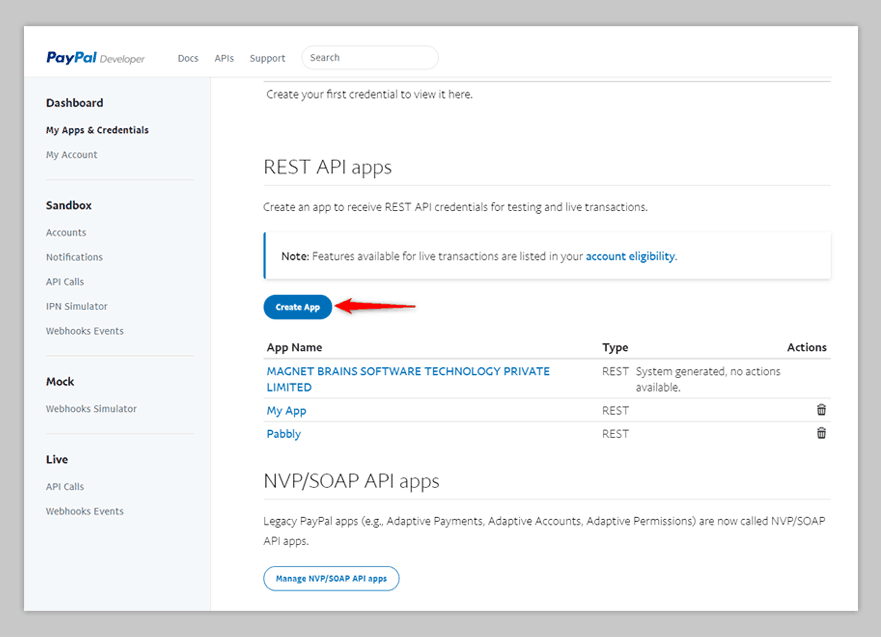
- Navigate To “REST API Apps” — Once clicked, scroll down to the “REST API Apps” section and click on “Create App” button.
- Create New App — Once you clicked on "Create App" button (in step 4 above), a pop-up window should appear, in which you'll enter this application's details such as "App Name" and "Sandbox Developer Account".
App Name should be the name of your application that you are creating.
Sandbox Developer Account takes your PayPal sandbox email address.
For example, If your PayPal email address is “mypaypal@gmail.com” then your Sandbox email address will be “mypaypal-facilitator@gmail.com“. Clearly, all you have to do is add “-facilitator” just before the “@” symbol.
After this, click on “Create App” button.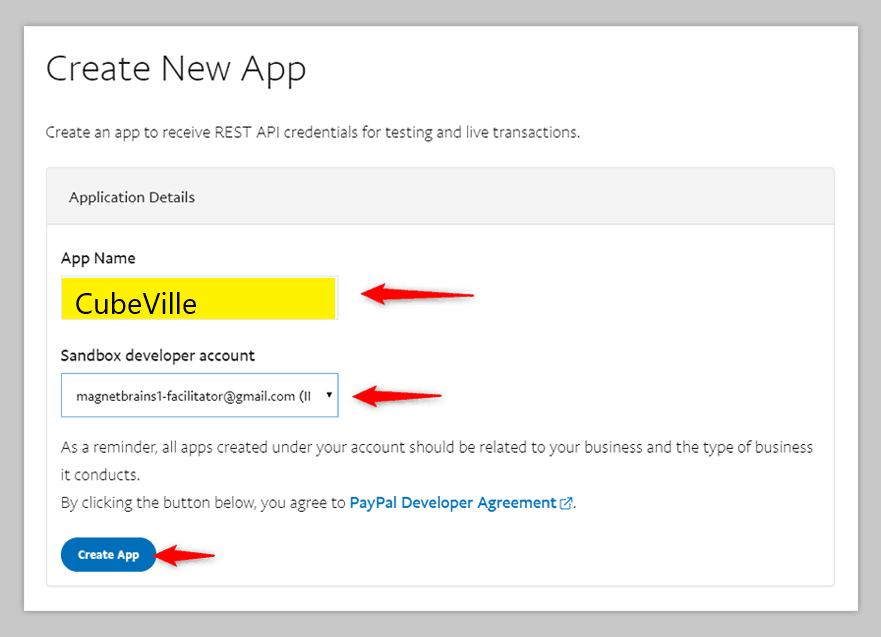
- Generate Client ID & Secret Key For Your App — Once you have created your app by clicking the “Create App” button (from step 5), you are now required to generate Client ID & Secret Key for your app by first, click on the “Live” button.
After this, your Client ID & Secret Key will be generated automatically.
- Select App Feature Options — Before moving to the next step make sure to select following checkboxes (after scrolling down) to make your app fully functional —
- Accept Payments
- Invoicing
- Payouts
After this, click on “Save”.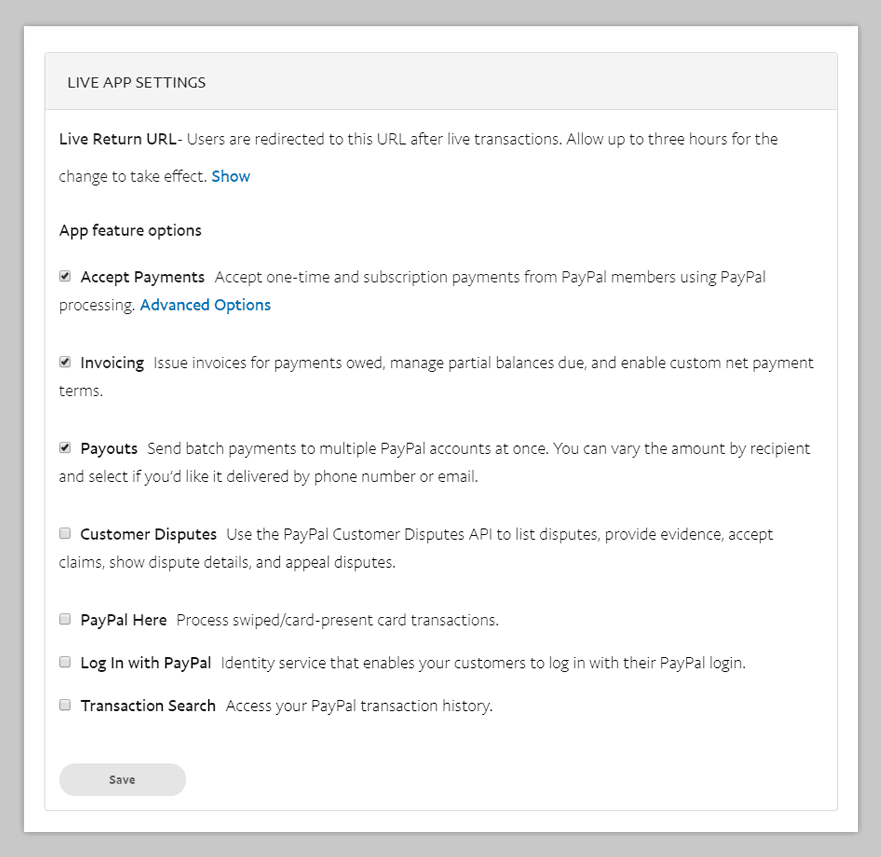
- Add PayPal Client ID & Secret Key In Admin Settings — The last step involves the addition of Client ID & Secret Key in your Pabbly Form Builder.
From your form builder, select Payment element. Now click on Configure Payment.
In that, select PayPal Payment Gateway, two new input fields will appear. One for Secret key and other for Client ID.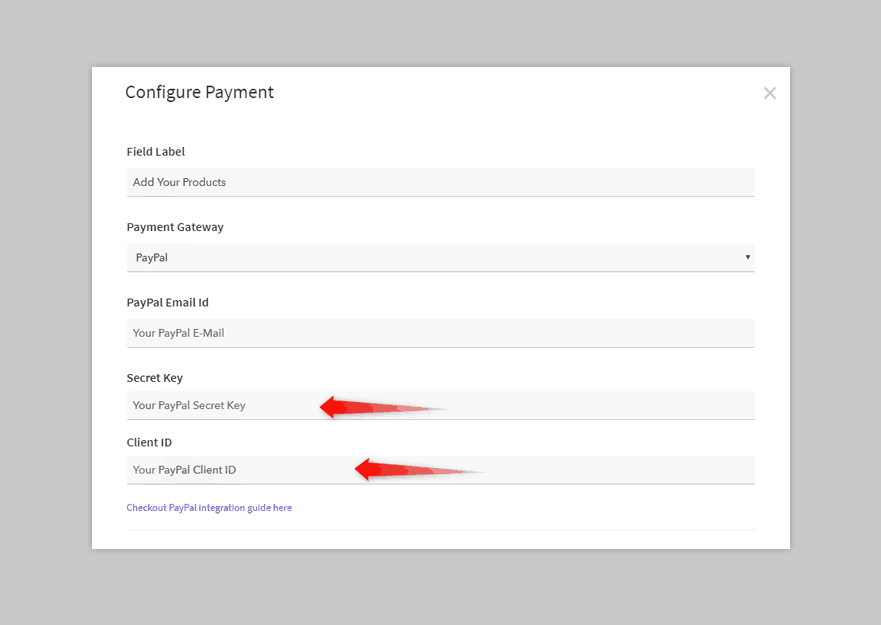
After setting up your products/Payment details, click on the “Save Payment Settings” button to save the settings. Now, you are all set to collect payments via PayPal Payment Gateway.
NOTE: PayPal and Stripe payment gateway charge some amount as a "Transaction Fees" on every customer transaction of yours.
ReCaptcha v2 - Configuration
The Site Key and Secret Key can be generated on this page:
https://www.google.com/recaptcha/admin/create
Choose reCAPTCHA v2 -> “I’m not a robot” Checkbox. Then fill in the other details and submit the form.
Finally, the reCAPTCHA v2 public and private keys are found on the following page:
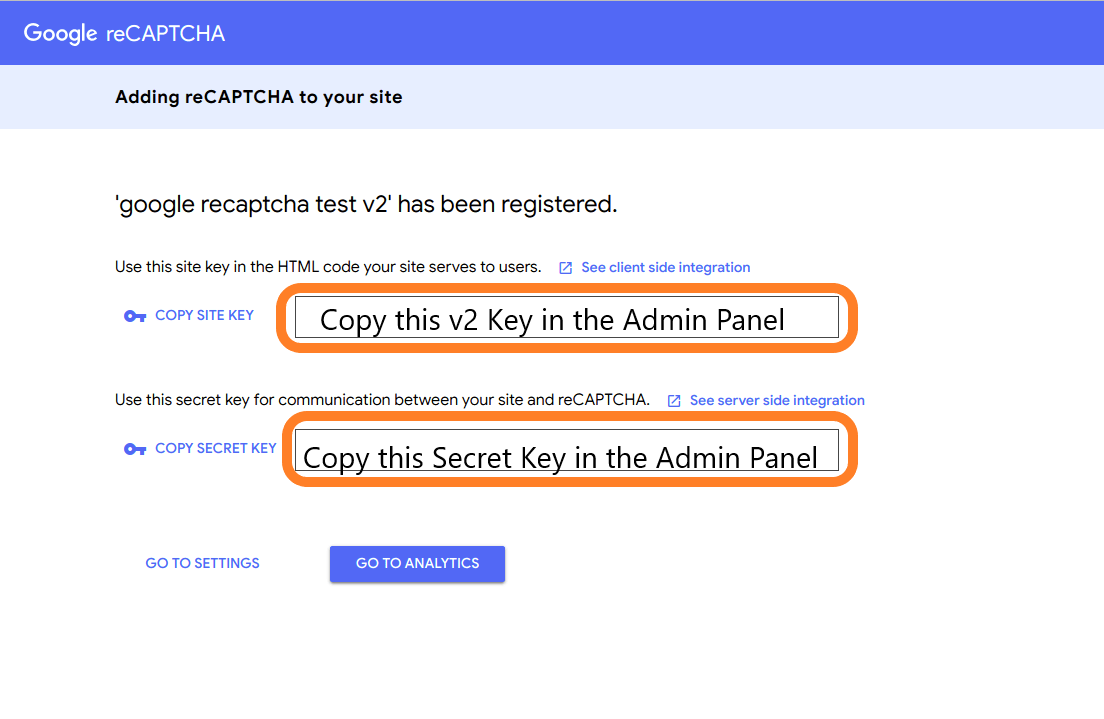
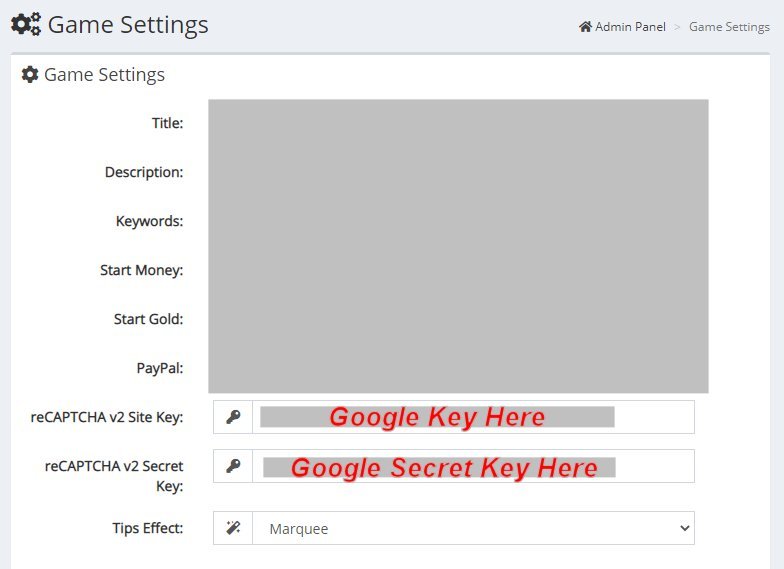
Put the generated keys in the related fields on the Game Settings page of the Admin Panel.
Facebook Login - Configuration
Your "application type" determines which Facebook products and associated APIs become available. If this is your first time creating such an item or you're just want to explore the creation flow, choose the "Something Else" option. Otherwise, we'll create a Facebook App for Legends of Renown Deeds™ using "Build or Connect to a Game". Later, when you are more familiar with their products and APIs, refer to their app types document to determine which type of category is best suited for Legends of Renown Deeds™, then create a new app and choose an appropriate type.
You will need the following:
- A Facebook Developer Account
- A registered Facebook App with Basic Settings configured
Follow the steps below to create a Facebook App and generate an "App ID" and "App Secret" designations.
- Go to the Facebook for Developers page and log into with your Facebook account.

- After you logon, click the "My Apps" menu tab

- You will see any existing apps you may have created. If this is your first Facebook App, click on the "Create App" button". A popup window should appear; you must select a type for this application you're creating. The choice you make determines how Facebook will process our game. There are five possible application types. Review the supporting documents for more detailed information here.:
- Business Integration;
- Build or Connect to a Game — as either a "Gaming Service" (a game hosted on your website), an "Instant Game" (a game hosted on Facebook's servers);
- Build Connected Experiences — apps that integrate consumer-related products like Facebook Login to provide app users with a more connected experience;
- More Options.

- Type in your app Display Name, contact email. Click the "Create App" button.

- Since I chose the "Build Connected Experience", I can "Add Products" to my game. I'll choose only the Facebook Login (for now). (more detailed information here.)

- In this next window, I'll choose "Web" and then answer the 5 "Quick Start" questions.

- Let's go directly to our "Setting > Basic" in the left menu; we'll skip the remainder of the "Quick start" for now.

- In "Setting > Basic", you'll see your "App ID" and "App Secret" — the App ID is visible and App Secret key is hidden. To see your "hidden App Secret", click on "Show" button. Now that you know both of the "App ID" and "App Secret" Keys, let's add those into our configuration file ("Source/config.php" Lines 9, 10, and 11). The "App ID" and "App Secret" are only accessible, by default, from your Facebook account. We must make these available for public access.
- In the settings, type your "app domain" name, your contact email, the URL of your "Privacy Policy", "Terms of Service", and "Cookie Policy". Upload an App Icon, and assign a category and sub-Category. This will be used by the FB servers, after authentication, to return control to our application.
- Now go to "Status & Review", and toggle your app as — LIVE — available for public.

Google+ Login - Configuration
https://developers.google.com/identity/sign-in/web/sign-in
Sources and Credits
Used resources:
- AdminLTE - github.com/almasaeed2010/AdminLTE
- Air DatePicker - github.com/t1m0n/air-datepicker
- Bootstrap Framework - GetBootstrap.com
- Bootswatch - bootswatch.com
- (optional back-end) CodeIgniter v2.x.x or v3.x.x PHP Framework
- CraftPix.net - Free 2D artwork
- DataTables - DataTables.net
- Facebook Graph SDK - github.com/facebookarchive/php-graph-sdk/tree/5.x/src/Facebook
- Font Awesome Icons - FontAwesome.com
- FreePik - FreePik.com
- Game Dev Market - Game assest for Indie Game Developers
- Image Map Resizer - github.com/davidjbradshaw/image-map-resizer
- jQuery - jQuery.com
- PayPal IPN - github.com/paypal/ipn-code-samples/tree/master/php
- (optional front-end) Phaser v2.x.x or Phaser III JS Gaming Framework
- Select2 - github.com/select2/select2
- SummerNote - SummerNote.org
- TweenMax - greensock.com/tweenmax
- VectorCharacters - VectorCharacters.NET
- WinWheel JS - dougtesting.net/home